How To Change Blade On Husky Box Cutter
Arias News
Mar 18, 2025 · 6 min read
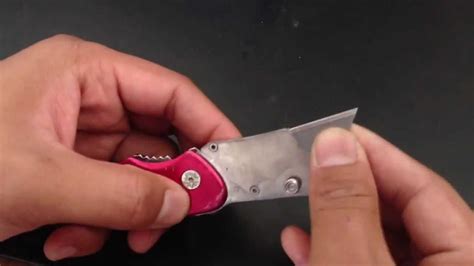
Table of Contents
How to Change a Blade on a Husky Box Cutter: A Comprehensive Guide
Changing a blade on your Husky box cutter might seem like a simple task, but doing it correctly ensures safety and extends the life of your tool. This comprehensive guide will walk you through the process step-by-step, covering various Husky box cutter models and offering essential safety tips. We'll also explore blade types, disposal, and troubleshooting common issues.
Understanding Your Husky Box Cutter
Before we delve into the blade changing process, it's crucial to understand your specific Husky box cutter model. While the basic principles remain consistent, slight variations might exist in the mechanism for releasing and installing new blades. Husky offers a range of box cutters, from simple utility knives to more robust models with features like retractable blades or blade storage compartments. Familiarize yourself with your tool's manual, if available, for model-specific instructions. Pay close attention to any safety warnings or cautions mentioned.
Identifying Your Box Cutter Type
Husky box cutters typically fall into a few categories:
- Standard Box Cutters: These are the most common type, featuring a simple blade-locking mechanism.
- Retractable Box Cutters: These models offer a mechanism to retract the blade, ensuring safety when not in use. The blade changing process might slightly differ due to this retractable feature.
- Heavy-Duty Box Cutters: Designed for more demanding tasks, these usually have a more robust blade-locking mechanism and might incorporate additional safety features.
Safety First: Essential Precautions
Working with any cutting tool necessitates prioritizing safety. Here are some essential precautions to take before and during the blade change process:
- Always unplug any power tools if you're using them in conjunction with your box cutter (e.g., when cutting through packaging materials).
- Wear appropriate safety gear: This includes safety glasses to protect your eyes from flying debris and potentially cut fingers. Gloves are also recommended to improve grip and protect your hands.
- Work on a stable, clean surface: Avoid working on uneven or slippery surfaces to prevent accidents.
- Keep the blade pointed away from your body: This is crucial during the entire process, from removing the old blade to installing the new one.
- Use caution when handling the used blade: Dispose of used blades immediately and safely to prevent injury.
Step-by-Step Guide to Changing a Husky Box Cutter Blade
The exact steps might vary slightly depending on your Husky box cutter model, but the general principles remain the same. Here's a comprehensive guide covering the most common scenarios:
1. Preparing the Box Cutter
- Turn the box cutter off if it's a retractable model. Ensure the blade is fully retracted.
- Inspect the blade: Observe how the blade is currently secured. This will help you understand the release mechanism.
- Gather your new blade: Always use the correct blade type for your Husky box cutter. Using the wrong type could damage the tool or lead to unsafe operation.
2. Releasing the Old Blade
This is the most crucial step, and the method will vary depending on your box cutter type:
- Standard Box Cutters: Look for a sliding mechanism, a button, or a lever. This is usually located near the blade. Engage the release mechanism, and carefully slide the blade out.
- Retractable Box Cutters: Retract the blade completely. Consult your user manual for the specific release mechanism. Usually, this involves a button, slider, or lever that allows you to access and remove the blade.
- Heavy-Duty Box Cutters: These often have more robust locking mechanisms. Refer to your manual for specific instructions. These may involve screws, clamps or other locking devices.
3. Installing the New Blade
Once the old blade is removed:
- Orient the new blade correctly: Observe how the old blade was positioned. The new blade should be aligned precisely to ensure proper function and safety.
- Insert the new blade: Slide or press the new blade into the designated slot. Make sure it's securely in place.
- Check the blade’s alignment: Verify that the new blade extends accurately and doesn't wobble or feel loose.
- Engage the locking mechanism: Once the blade is securely positioned, engage the locking mechanism to hold the blade firmly in place.
4. Testing and Safe Disposal
- Test the blade's sharpness and functionality: Gently test the blade on a piece of scrap material to ensure it cuts smoothly and doesn't snag or jam.
- Dispose of the used blade properly: Never throw used blades in regular trash. Dispose of them in a designated sharps container or recycle bin, according to your local regulations.
Blade Types and Selection
Husky box cutters are compatible with various blade types. Understanding the different types and choosing the right one is crucial for optimal performance and safety.
Common Blade Types:
- Standard Blades: These are the most common type, suitable for most general-purpose cutting tasks.
- Hook Blades: Designed for more precise cuts and ideal for opening boxes and cartons.
- Snap-off Blades: These blades have multiple segments that can be snapped off when dull, extending the life of the blade. This minimizes waste.
- Specialty Blades: Husky might also offer specialty blades for specific applications like ceramic, carpet, or drywall.
Choosing the Right Blade:
Consider the following factors when selecting a new blade:
- Material to be cut: Different materials require different blade types and sharpness levels.
- Desired cut quality: For precise cuts, choose a sharper blade with the appropriate type.
- Frequency of use: For frequent use, choose a durable blade that will last longer.
Troubleshooting Common Issues
Sometimes, you might encounter issues while changing your Husky box cutter blade. Here are some common problems and their solutions:
- Blade won't release: Check the release mechanism carefully. Ensure you're engaging it correctly. If the mechanism is stuck, you might need to use a small tool to gently dislodge it. Avoid using excessive force.
- Blade won't align correctly: Check the orientation of the blade. Make sure it's inserted correctly. A misaligned blade can lead to unsafe operation and damage the tool.
- Blade is loose: Check the locking mechanism. Ensure it's properly engaged to hold the blade firmly in place. If the mechanism is damaged, you might need to replace the entire box cutter.
- Blade is difficult to retract (for retractable models): Clean any debris from the retraction mechanism. Lubricate the mechanism if necessary.
Maintaining Your Husky Box Cutter
Proper maintenance extends the life of your Husky box cutter and ensures safe operation. Here are some maintenance tips:
- Regular cleaning: Keep your box cutter clean and free of debris. Use a brush or compressed air to remove dirt and dust.
- Blade inspection: Regularly inspect the blade for signs of damage or dullness. Replace the blade immediately if it’s damaged or dull.
- Proper storage: Store your Husky box cutter in a safe and dry place, away from children.
Conclusion
Changing a blade on your Husky box cutter is a simple yet crucial task. Following these steps and prioritizing safety will ensure smooth operation, prolonged tool life, and prevent injuries. Remember to choose the correct blade type for your specific needs and dispose of used blades safely. By understanding your tool and following these guidelines, you can efficiently and safely maintain your Husky box cutter for years of reliable use. Always refer to your user manual for model-specific instructions and safety warnings.
Latest Posts
Latest Posts
-
How Many Fridays Are There In A Year
Mar 18, 2025
-
897 100 Rounded To The Nearest Ten Thousand
Mar 18, 2025
-
How Many Yards Does A Concrete Truck Hold
Mar 18, 2025
-
How To Pronounce Joses In The Bible
Mar 18, 2025
-
How Long Does It Take To Count To 1000
Mar 18, 2025
Related Post
Thank you for visiting our website which covers about How To Change Blade On Husky Box Cutter . We hope the information provided has been useful to you. Feel free to contact us if you have any questions or need further assistance. See you next time and don't miss to bookmark.
